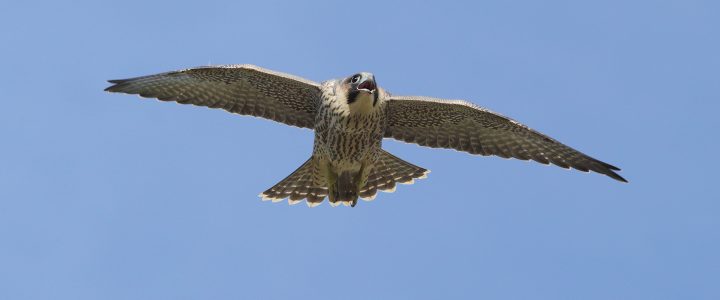
Photographing action is one of the toughest aspects of wildlife photography and none more so than photographing birds in flight. It requires practice and perseverance – along with a little technical know-how.
What Lens to Use?
For the majority of bird photography you’ll need a fairly big lens – probably 400mm or bigger; but for birds in flight a 300mm may suffice. The focal length however isn’t the only consideration. Are you likely to be hand-holding? In this case the weight is a significant issue. If you’re not sure, the best way is always to test one out – you’ll soon get an idea just how long you can hold it for! I’ve been a Canon user for a long time and the Canon EF 300mm f 2.8 (Mark i and Mark ii) has long been regarded as one of the best lenses out there for photographing birds in flight. Other options include the Canon EF 400mm f5.6 and the Canon EF 100-400mm f4.5 – f5.6 IS (Mark i and Mark ii). All these lenses are suitable for hand-holding and can be carried around for reasonable amounts of time. Longer lenses such as the Canon EF 500mm f4 IS (Mark i and Mark ii) and the Canon EF 600mm f4 IS (Mark i and Mark ii) can also be excellent for flight photography but can only be hand-held for short periods of time due to their weight It’s more appropriate is to use these larger lenses with a tripod and a gimbal head allowing for quick changes of direction when tracking birds.
Flight Photography Technique
It’s tempting to try and concentrate solely on keeping the bird within the focus points. Whilst this is the idea, I find it best to try and match the speed and movement of the bird – so try and think of it more that way when you’re tracking. When hand-holding try to pan from the waist whenever possible; stay reasonably relaxed and fire the shutter smoothly: watch the YouTube video to see me demonstrating When using a gimbal head, make sure you adjust the resistance knobs so it is comfortable for you. It’s also important to be aware of relative speed. If a bird is in the distance you won’t have to move the camera as quickly but once it comes near you will have to pick up the speed of panning. Most modern lenses will also have image stabilisation/vibration reduction. It is sometimes believed that they help to get sharp images of action but in reality that’s not really the case. Using IS or VR won’t stop movement of your subject – and with fast shutter speeds it probably won’t have much effect on camera shake either. However, it can help by stabilising the viewfinder, thereby making tracking a little easier.
Shutter Speeds and Apertures
Above all you need a fast shutter speed for birds in flight. I like to be at 1/1000 or faster most of the time. However, every situation varies. Whilst 1/1000 is a good shutter speed to aim for, slower moving birds such as hunting owls can be photographed with slower speeds such as 1/500. On the quicker side, a diving red kite for example or a small bird in flight, and you’ll often need 1/2000 or higher.

As for choice of aperture, setting a fairly wide aperture will let in more light, helping to keep the shutter speed higher. That said, I like to stop down a little to ensure a greater depth of field throughout the bird. With a lens of 400mm or 500mm I’ll often use around f7.1. In terms of ISO it’s really a case of adjusting this to give you an accurate exposure without creating too much noise in the image. In bright light you might not need to go above ISO 400 whilst in duller conditions and when shooting near sunrise or sunset you might be closer to ISO 2000.
Focusing and Frame Rate
For birds in flight you’ll need the tracking auto-focus option. The will be AF-C on Nikon and AI Servo on Canon. So long as you keep the focus engaged this will track the bird continuously. You can focus with the shutter button (half pressed) or you can use the Back Button Focusing method. Experiment to see what works best for you. You need to have the frame rate set to continuous as you’ll want to take a burst of images. Modern cameras can shoot 14 frames per second and more but the majority of the time a frame rate of around 7 frames per second is sufficient. On advanced cameras such as the Canon 1DX you can set a maximum and minimum frame rate.
When it comes to the actual area of focus there are a number of options. A single focus point in the centre can often be accurate. However, a small cluster of 4 or 9 for example, around the centre is also a good option. My advice is to use less focus points if the background is a little ‘busy’ and if the bird is relatively small in frame. If the bird is more frame filling with a good clear background then you may be able to use all the focus points effectively.

Exposure
This is probably the trickiest of all and you should experiment to find your favoured way of exposing for birds in flight. If lighting conditions are consistent then manual exposure can work well. In bright sun with clear skies, set your desired shutter speed and aperture, then point the camera directly above at the deepest part of the blue sky. Adjust the ISO until the exposure meter is in the centre. This will give you a good base reading; you may need to adjust slightly. The advantage of manual exposure is that you are in complete control of all settings. Aperture Priority, A or AV, can be ideal and certainly works well in changing light. Here you will set your preferred aperture and the camera will select the shutter speed. Adjust the ISO so you are getting a fast shutter speed of around 1/1000. One issue with this method is if the sky is quite light you will need to add some plus exposure compensation (overexpose) to stop the image coming out too dark. Shutter Priority mode can also be used but is more complicated to achieve consistent results.
Click Here to watch my video on Understanding Exposure

Auto ISO is another useful exposure tool where the camera adjusts the ISO itself. In manual exposure you can set both the shutter speed and aperture then select Auto ISO; only the ISO will change. In Aperture Priority you set the aperture and the camera adjusts the ISO (and shutter speed to an extent).
There’s a lot when it comes to photographing birds in flight but like anything it just takes practice. Put all these skills to good use and you’ll soon be surprising yourself at the quality of your bird shots! If you want to improve your wildlife photography skills consider joining one of my Wildlife Photography Workshops or a day of tailor made One to One Tuition


